Wednesday, July 13, 2011

Cherry Blondies

The last thing I made with our freshly-picked cherries was this pan of cherry blondies. 

Ingredients (adapted from Chiles Peach Orchard):
  • 1-1/3 c. flour
  • 1-1/3 c. packed light brown sugar
  • 1 tsp. baking powder
  • 1/2 tsp. salt
  • 1/2 c. coconut oil
  • 2 eggs
  • 1 tsp. vanilla
  • 1 c. pitted and halved fresh sweet cherries
  • 1/2 c. chopped pecans (optional)
To make:
  • Preheat oven to 325*
  • Combine flour, brown sugar, baking powder, salt, oil, eggs and vanilla; mix on low speed of electric mixer until blended
  • Mix 1 minute on medium speed (batter will be thick)
  • Spread half of batter in oiled and floured 8x8-inch baking pan.
  • Toss cherries in small amount of flour and scatter cherries over batter
  • Spread remaining batter over cherries
  • Sprinkle pecans over top
  • Bake 30 to 35 minutes or until wooden pick inserted near center comes out clean
  • Cool on rack and cut into 16 pieces


Taste-wise, they were pretty good, though they were a bit weird texture-wise because I'm just not used to fruit in blondies/brownies.  My only real issue was determining whether they were done.  I think the juiciness of the cherries kind of threw things off a bit.  I think they'd be even better with chocolate or white chocolate in addition to/instead of the pecans. 

Sunday, July 10, 2011

Yummy (and Easy) Pizza Sauce

We interrupt the regularly scheduled programming for a special recipe (I promise I have one more cherry recipe to share).

I have had a hard time finding a pizza sauce I like.  I used to like the Whole Foods stuff but lately it's been a bit bland.  I've tried the TJ's sauce in the cold case but found it lacking, and I decided to pass on the TJ's jarred sauce because of some unsavory additives.

Then today I had an idea!  I love TJ's bruschetta - it's the best I've found next to homemade.  So I grabbed a jar and decided to throw it in the blender (the bruschetta, not the jar) with some tomato paste I had leftover from a curry debacle earlier in the week (don't ask - let's just say it was edible but nowhere near as good as my sister-in-law's).  Yes, it's kinda cheating.  I could have done it from scratch.  But this was a lot quicker and easier, with no guesswork on spices.  Unfortunately I didn't measure anything, so the following are estimates.

Ingredients:
  • Approximately 6 oz bruschetta
  • 1-2 tbsp. tomato paste
  • Splash of olive oil
Toss it all in the blender or a food processor and give it a whirl.  Adjust tomato paste and olive oil as needed.

It is so good!  And it's nice to have a starting place for homemade sauce.  When I have the chance, I'll try using my bruschetta recipe instead of cheating.

Wednesday, July 6, 2011

Pork Chops with Cherry Sauce

After a few days of chowing on fresh cherries, I decided I needed to incorporate them into a dinner somehow.  Cherries pair well with pork, so I went in search of a cherry sauce for some nice center cut pork chops I bought from Whole Foods.  I found a simple recipe but I didn't have any port (and I didn't feel like going out to find some), so I subbed pomegranate juice instead.

Cherry Sauce:
  • 1 c. sweet cherries, pitted and halved
  • 1 tsp. olive oil
  • 1 small shallot, minced
  • 1/3 c. pomegranate juice
  • 1 tsp. balsamic vinegar
  • Salt & pepper
To make:
  • Heat oil in small saucepan
  • Saute minced shallot until softened
  • Add cherries, pomegranate juice, and vinegar; cook until cherries soften and juice is reduced by about half
  • Remove from heat, season with salt & pepper, and set aside until pork is finished

For the pork, I bought three center cut pork chops (they were maybe 1/4 to 1/3 of a pound each), rubbed them with salt, pepper, and a bit of thyme, and grilled them.  There was more than enough sauce for the three chops.

The picture isn't the best; something about the combination of shiny sauce, the light, the white plate, and the camera flash just conspired against me.  Oh well, you get the idea.

I enjoyed this.  It was a little sweet and a little tart, and it paired well with my cherry rice pilaf.

Monday, July 4, 2011

Kicking off Cherry Week - Cherry Pudding Cake

Summer is such a busy, fun time of year.  No wonder I haven't found time to update the blog!  One of our many fun activities this summer was cherry picking.  This was the first time for John and the kids, and my first time in many years.  We went with some friends and had a blast, even though the orchard was 1.5 hours from home.  We picked about 5.5 pounds and Samantha ate about a half-pound on the way home! 

The next day, I made muffins with cherries for breakfast and then made a cherry pudding cake.  I admit, I was skeptical when I first read the recipe, mainly because I could not imagine what would happen when I poured boiling water over it before putting it in the oven.  It sounds weird and looks weird, but trust me, it turns out great. 

Ingredients (slightly adapted from here):
  • 2 c. sweet cherries, pitted
  • 1 c. flour
  • 1 tsp. baking powder
  • ¼ tsp. salt
  • 1 ½ c. sugar
  • ½ c. So Delicious Vanilla Coconut Milk
  • 3 tbsp. Earth Balance butter, melted
  • 1 tsp. vanilla extract
  • 2 tbsp. flour
  • 1 c. boiling water
To make:
  • Preheat oven to 350°F
  • Place fruit in the bottom of a buttered 8x8 glass baking dish
  • Combine 1 c. flour, baking powder, salt, and 3/4 c. sugar in a mixing bowl
  • Add milk, butter, and vanilla
  • Beat until smooth
  • Spread batter over fruit
  • Combine remaining sugar and 2 tbsp. flour and sprinkle over batter
  • Pour boiling water over mixture 
  • Bake 40-45 minutes or until tester comes out clean when inserted in center
It looks strange going into the oven but this is what it looks like when it comes out:


And it is soooooo good.


I think I'm going to try it with peaches next.  

Friday, May 27, 2011

Frittata

Last summer, I really got into making frittatas with the farm-fresh eggs and other yummy produce we got in our CSA box.  We called it "Frittata Friday."  I like to make it when we have company, too, because it is super easy, yummy, and makes a lot.  And I always get asked about my recipe.  Well, here goes . . . it's not really so much a recipe as a method.

Preheat broiler.  Saute a bunch of veggies (asparagus, mushrooms, zucchini, bell peppers, sundried tomatoes, and spinach are all good choices) on the stove in an oven-safe skillet.  You can even add some cooked pancetta or bacon or sausage if you want.  Season with salt and pepper.  Lightly beat eggs (use the number of eggs equal to the diameter of the skillet.  So 10 eggs for a 10" skillet, 12 for a 12", etc.).  Pour in skillet, stir, and cook until eggs are mostly set.  If you want, top with cheese of your choice (goat cheese is fantastic!) and broil until eggs are set and cheese is melted/lightly browned (keep a close eye, those sneaky broilers are notorious for burning things in an instant).

Removing the frittata from the pan can be tricky.  What I usually do is run a knife around the edge of the skillet, run a spatula up under the frittata to help loosen it from the skillet, place a cutting board on top of the skillet, flip, and say a little prayer that it comes out!  Since it's now upside-down, I put the serving plate on it and flip it back over, then slice into 8 pieces.

Wednesday, May 25, 2011

Red Velvet Cake Balls

Sadly, I can’t take credit for this idea – I got it from the Bakerella blog and made a few modifications.  My original plan was to make Bakerella's doggie cake pops for Samantha's birthday.  Then I remembered I had a newborn . . . so I scaled back my delusious of grandeur and settled on cake balls.  I still have hopes of making those cake pops someday. 

I wanted to make these because they seemed so much easier (read: less messy) for Samantha's friends at day care to eat than birthday cupcakes or cake.  I figured the teachers would be grateful.  And they were.  I also had requests for the recipe.  More than two months later, I'm finally getting around to typing the whole thing up. 

Cake (you can use a box mix but I prefer to make my own – adapted from The Joy of Baking):
  • 2 ½ c. cake flour, sifted
  • ½ tsp. salt
  • 2 tbsp.  cocoa powder
  • ½  c. unsalted butter, room temperature (I used Earth Balance soy-free)
  • 1 ½ c. sugar
  • 2 large eggs
  • 1 tsp. pure vanilla extract
  • 1 c. buttermilk (I used 1 c. unsweetened So Delicious Coconut Milk Beverage “curdled” with 1 tbsp. distilled white vinegar)
  • 2 tbsp. red food coloring
  • 1 tsp. distilled white vinegar
  • 1 tsp. baking soda
Directions:
  • Preheat oven to 350 and place rack in center of oven.
  • Butter a 9x13” cake pan/glass baking dish
  • In a mixing bowl sift together the flour, salt, and cocoa powder. Set aside.
  • Using a stand mixer or hand mixer, beat the butter until soft (about 1-2 minutes).
  • Add the sugar and beat until light and fluffy (about 2-3 minutes).
  • Add the eggs, one at a time, beating well after each addition.
  • Scrape down the sides of the bowl.
  • Add the vanilla extract and beat until combined.
  • In a measuring cup whisk the buttermilk with the red food coloring.
  • With the mixer on low speed, alternately add the flour mixture and buttermilk to the butter mixture, in three additions, beginning and ending with the flour.
  • In a small cup combine the vinegar and baking soda. Allow the mixture to fizz and then quickly fold into the cake batter. 
  • Pour batter into buttered dish and smooth top with the back of a spatula. 
  • Bake in the preheated oven for approximately 25 - 30 minutes, or until a toothpick inserted in the center of the cakes comes out clean.
  • Allow cake to completely cool.

Buttercream Frosting (again, you can use canned but I prefer homemade):
  • 3 c. confectioners' sugar
  • ½ c. butter (again, I used Eath Balance soy-free)
  • ½ c. shortening
  • 1 tsp. vanilla extract
  • 1-2 tbsp. whipping cream (I used So Delicious French Vanilla Coconut Milk Creamer)
Directions:
  • In a stand mixer fitted with a whisk, mix together sugar and butter. Mix on low speed until well-blended and then increase speed to medium and beat for another 3 minutes.
  • Add vanilla and cream (start with 1 tbsp. and add more if frosting seems too thick) and continue to beat on medium speed for 1 minute

Coating for cake balls:
  • 12 oz semi-sweet chocolate morsels
  • 2 oz unsweetened baking chocolate
  • 1 tbsp. coconut oil (butter or canola/vegetable oil will work, too), optional
Making the cake balls:
  • In a large bowl, crumble cake
  • Mix in frosting until cake holds its form when rolled into a ball (it’s messy, but a lot easier to use your hands to mix in the frosting) (if you use canned, you’ll probably need about ¾ of a 16oz tub, with the homemade, I think I used most of it)
  • Roll mixture into quarter-sized balls (I usually get 4 dozen) 
  •  Place on parchment or wax lined cookie sheets and chill or freeze for several hours (I put mine in the deep freeze overnight – it really made dipping easier)
  • Melt chocolate over double boiler or in microwave being careful not to get any water in it.  Stir in oil if necessary to thin enough to easily dip cake balls.
  • Dip cake balls – I found it easiest to put the ball on a spoon, dip, then transfer back and forth between two spoons to make sure the ball was coated and to let excess drip off
  • Place on parchment/wax lined cookie sheet to set - if decorating, be sure to do so before chocolate sets too much 

Store in an airtight container.

I got a ton of compliments on these.  They are sooo good and soooooo rich.  If you don't need all of them right away, I'd put any undipped cake balls in an airtight container and freeze them.  In fact, I have some in the freezer now . . .

Wednesday, May 4, 2011

Cherry Vanilla Granola

I have been obsessed with granola lately.  Seriously obesessed.  I posted a status on Facebook yesterday about that obsession and a friend asked me for the recipe, which I graciously shared with her.  Then I remembered . . . "hey, I have a blog I haven't updated lately."  So here it is:

Ingredients:
  • 3 c. rolled oats
  • 1 c. unsweetened shredded coconut
  • 1 c. seeds/nuts (I have been using 1/2 c. raw sunflower seeds and 1/2 c. raw pumpkin seeds lately)
  • 1/4 c. coconut oil (or butter)
  • 1/3 c. honey
  • 1 tbsp. vanilla extract
  • 1/2 tsp. salt
  • 1 c. dried montmorency cherries
To make:
  • Preheat oven to 300
  • Mix first three ingredients
  • Melt coconut oil and honey on the stove
  • Add salt and vanilla extract
  • Stir honey mixture into oat mixture
  • Spread on parchment lined baking sheet (foil works, but the granola does stick)
  • Bake for about 30 minutes, until golden brown, gently stirring after 15 minutes
  • Remove from oven and allow to cool
  • Pour into airtight container and stir in dried cherries


Homemade granola allegedly lasts 3-4 weeks in an airtight container.  I haven't tested this theory.  Mine usually lasts 3-4 days before it's gone! 

Monday, April 18, 2011

Chicken Bacon Ranch Pizza

Chicken bacon ranch pizza made with vegan ranch dressing and vegan cheese.  As a friend commented, this invokes thoughts of the song "one of these things is not like the other ones."  But, you do what you gotta do when you can't eat dairy or soy. 

First, the ranch dressing.  It's no Hidden Valley Ranch, but it's pretty good.  Samantha liked it, so that's good enough for me!

Ingredients (adapted from here):
  • 1 c. mayo (I used Whole Foods' 365 brand, which is dairy/soy free)
  • 3/4 tsp. garlic powder
  • 3-4 tbsp. minced onion (or 1/2 tsp. onion powder - I just didn't have any)
  • 1 tsp. dill
  • 1/2 tsp. freshly ground black pepper
  • Splash of apple cider vinegar or lemon juice
  • up to 1/2 c. unsweetened So Delicious Coconut Milk
  • Salt
To make:
  • Whisk first 6 ingredients together
  • Slowly whisk in milk until dressing is the desired consistency
  • Add salt to taste
  • It's best to let this sit in the fridge for a bit to let the flavors mingle 
I spread a bit of this on my homemade dough and added some Daiya mozzerella, grilled chicken, cooked bacon, and roma tomato slices.  It was really yummy . . . so good that I was too busy chowing down to take a picture!  Whoops.  Guess I'll have to make this again!  I think I can make the sacrifice. 

Wednesday, April 13, 2011

Cherry Rice Pilaf

Here's the rice pilaf recipe I promised you the other day.  I know y'all couldn't even sleep in anticipation.  Well, I promise, you will not be disappointed if you make this.  It is sooooo good.

Ingredients (adapted from my I Love Trader Joe's cookbook):
  • 3 c. cooked rice (I used brown, gave it a nice crunch)
  • 2 tbsp. Earth Balance butter
  • 1 medium onion, diced
  • 1 c. diced celery
  • 1/2 c. dried montmorency tart cherries
  • 1 tsp. dried thyme
  • Salt & pepper
To make:
  • Melt butter in large skillet
  • Saute onion, celery, cherries, and thyme until softened
  • Stir in cooked rice
  • Season with salt & pepper

Super easy and super tasty.  I doubled the recipe for the six adults and 2 kids and we had plenty left over (the leftovers were really good, too).  The original recipe called for 1/2 c. chopped walnuts, but I left those out.  I didn't really miss them, either.  The brown rice added a nice texture that you just don't get with white rice.  And the cherries . . . oh, the cherries. They really plump up and become soft.  Yum!

Friday, April 8, 2011

Brown Sugar Glazed Salmon

We had a full house (apartment) last weekend.  My sister-in-law, brother-in-law, and nephew came out from CA for a couple of days and my inlaws decided to drive out, too!  The visit was far too short, but we had a good time and lots of good food.  Plus we celebrated Samantha's 3rd birthday!

I decided to make glazed salmon for Friday's Lenten dinner.  But not just any old salmon . . . glazed salmon. 

Ingredients:
  • 2lbs. salmon (I used wild coho salmon from TJ's - so tasty!)
  • 2 tbsp. Earth Balance butter
  • 1 tbsp. honey
  • 3 tbsp. packed light brown sugar
  • 1/4 c. whole grain dijon mustard
  • 2 tbsp. olive oil
  • Salt & pepper
To make:
  • Preheat oven to 400
  • Melt butter, honey, and brown sugar in small saucepan
  • Remove from heat san whisk in olive oil and mustard
  • Season both sides of salmon with salt & pepper
  • Brush with brown sugar mixture
  • Bake for 15-20 minutes, until salmon flakes with a fork


This was so good!  Not too sweet with just a little tang from the mustard.  We had a couple of pieces left over and it reheated well, too.  I usually don't like reheated salmon; it just doesn't taste good.  But this was pretty tasty when I reheated some on Sunday. 

I served this with steamed veggies and a really yummy rice pilaf.  I think the rice may have been a bigger hit than the salmon.  Watch for that recipe up next!

Tuesday, March 29, 2011

Balsamic Roasted Potatoes

Looking for something new to do with potatoes?  Look no further!  These are really good and super easy, too.  I wasn't too sure about them at first, but they grew on me as I was eating them. 

Ingredients (adapted from Everyday Food):
  • 1 1/2 lbs potatoes, cut in chunks
  • 3/4 c. low sodium chicken broth
  • 1/4 c. balsamic vinegar
  • 8 cloves of garlic, smashed
  • 1/2 tsp. thyme
  • Coarse salt & pepper
To make:
  • Preheat oven to 425
  • Combine all ingredients in an 8" baking dish
  • Bake until potatoes are tender 1 - 1 1/4 hours and liquid reduces to glaze, tossing a couple of times
  • Season with salt and pepper

Saturday, March 26, 2011

Seafood Linguini with Leeks

I love reading cook books and you all know I love Trader Joe's.  So what could be better than reading a cook book that uses all TJ's ingredients?  I got the I Love Trader Joe's cook book for Christmas and it's full of lots of yummy, easy recipes.  It has pretty pictures, too!

I've been wanting to try this recipe for a couple of months but something held me back - I hate leeks.  Or at least I thought I did.  I recall eating a potato leek soup when I was a kid and hating it so I never tried leeks again . . . until now.  And guess what?  I DO like leeks.  Just goes to show you, you should always give foods you hated as a kid a second chance as an adult.   I'm glad I tried this - it was really good!

Ingredients (adapted from the I Love Trader Joe's cook book):
  • 1 lb linguini, cooked and drained
  • 1 tbsp. olive oil
  • 1 tbsp. butter
  • 2 leeks, cleaned and thinly sliced (I actually used a bag of frozen leeks from TJ's)
  • 2-3 cloves of garlic, minced
  • 5 oz crimini mushrooms, thinly sliced, optional
  • 1/2 vegetable broth
  • 1/2 lb. seafood (the original recipe calls for shrimp, but I used a shrimp/scallop/calamari blend from TJ's)
  • Salt & pepper
The original recipe calls for a "handful" of arugula.  I didn't feel like buying a whole bag of arugula for one handful, so I didn't.  I think I will next time.  It would bring a nice nutty/spicy flavor.  The original also calls for 1/4 c. Parmesan cheese but since I'm off dairy, I obviously didn't use it. 

To make:
  • Heat olive oil and butter in medium saute pan
  • Saute leeks until tender, about 5 minutes
  • Add garlic and saute 1-2 minutes, until fragrant
  • Add mushrooms, if using, and saute until tender 
  • Add broth and bring to a boil
  • Simmer for about 5 minutes to slightly reduce sauce
  • Add shrimp/seafood and cook just until shrimp turns pink
  • Toss mixture with cooked pasta
  • Add arugula and Parmesan, if using, toss and season with salt and pepper

Saturday, March 19, 2011

More Pizza!

For last pizza night, I got the brilliant idea to make a chicken fajita pizza.  The only question was, what to use in place of tomato sauce?  This problem plagued me for a couple of days until I remembered I had Crockpot Refried Beans in the freezer.  Would it work?  I couldn't wait to find out! 

I sliced up a large chicken breast and sauteed it in a bit of olive oil, salt, and pepper.  I reserved half the chicken for the other pizza, a chicken bacon concoction.  To the remaining chicken, I added half a bag of frozen roasted peppers and onions (from TJ's) and 1 tsp. each cumin, chili powder, and garlic powder, cooking until heated through.  I spread a thin layer of refried beans on the pizza crust, then topped with the fajita mixture and Daiya "mozzerella."  Baked it in a 450* oven for about 12 minutes and got this:


The one on the right is the chicken fajita pizza.  On the left is the chicken bacon. 

It was so good!  The beans made it a very hearty, filling pizza.  But not so hearty that we couldn't dive into the other pizza, a yummy chicken bacon pizza.

I wanted to do chicken bacon ranch pizza, but do you know how hard it is to find dairy and soy free ranch?!  I'd have made it myself but the only mayo we had on hand had soybean oil in it, so I couldn't.  But I'm going to try it sometime.

"Hat" Pasta

Well, that's what Samantha calls it.  I call it amazing!  I made this pasta for the first time last week and fell in love.  So in love that I made it again this week.  It's so simple, yet so delicious!  Seriously, you have to try it.

Ingrdients (adapted from Everyday Food):
  • 1 lb. any short pasta (I used orecchiette, which looks kind of like a hat . . . now you see where the name came from)
  • 4oz diced pancetta (I get mine already diced from TJ's) or 4 slices of bacon, chopped
  • 8oz broccolini, cut into bite-sized pieces
  • 4-5 large cloves of garlic, thinly sliced
  • 2 shallots, sliced
  • 8oz mushrooms, sliced (I used shitake because that's what we got in our CSA box, usually I'd use cremini), optional
  • 3oz sundried tomatoes, optional
  • Salt & pepper
To make:
  • Cook pasta according to package directions
  • During the last 2 minutes of cooking, add broccolini
  • Drain pasta, reserving 1 c. pasta water
  • In the same pot, cook pancetta for 2-3 minutes, rendering fat
  • Add garlic and shallot and saute for about 1 minute, until fragrant
  • Season with salt and pepper
  • Add mushrooms and cook until browned
  • Add sundried tomatoes, pasta and broccolini to pot, tossing with enough reserved pasta water to make a thin coating of "sauce" on the pasta
  • Season with salt and pepper if needed


Like I said, super easy!  The first time I made this, I used pancetta and did not add mushrooms or sundried tomatoes.  The second time, I used bacon and did add the mushrooms and sundried tomatoes (these were added on a whim, as I bought a pouch of them at TJ's for no particular reason other than because they were a new product and looked good.  Darn impulse buys!).  Honestly, while the bacon was good, I enjoyed it with the pancetta just a bit more.  I loved the addition of sundried tomatoes and mushrooms but it was good without them, too.  If you can't find broccolini (sometimes called baby broccoli enven though it's not really), I'm sure regular broccoli will work well.  The broccolini is just a bit sweeter and the stalks are more tender.  If you wanna get crazy, the original recipe calls for broccoli rabe instead of broccolini, but I'm not really a fan - it's a bit bitter for me.

For my vegetarians out there, 2 tbsp. of olive oil should be sufficient to replace the pancetta fat.

Seriously, try this.

Friday, March 11, 2011

Crockpot Refried Beans

I know I promised this recipe almost two weeks ago, in my Veggie Quesadilla post.  I've been a slacker and I apologize. 

I've been trying to get away from canned foods as much as possible, plus I love to use my crock pot, so I decided to try my hand at refried beans.  How hard could it be?  Not hard at all, as it turns out.  The only thing I wasn't sure about was soaking the beans because I'd never done it before.  But it's not difficult and a bag of dried beans is much cheaper than cans of beans.

Ingredients:
  • 3 c. dried pinto beans, rinsed and soaked overnight
  • 7 c. water (saved from soaking beans)
  • 1 onion, peeled and halved
  • 1 4oz can of diced green chiles (or you could use minced fresh jalepeno or other chile.  I just didn't have fresh on hand)
  • 2 tbsp. garlic (I used freshly minced, maybe 10 cloves depending on size)
  • 1 tbsp. ground cumin (less/more to taste)
  • 2 tsp. freshly ground black pepper
  • 2 tsp. salt (or more to taste)
  • Juice of 1/2 lime (or more to taste)
To make:
  • Place soaked beans, onion, chiles, garlic, cumin, and pepper in 6 qt. crock pot
  • Stir in water
  • Cook on high for about 8 hours (add a bit more water if needed during cooking)
  • When beans are cooked, mash with potato masher
  • Season with salt and lime juice


(yes, I know that's the same picture I used before.  When I made these beans I hadn't started the blog yet.  Besides, this is a pretty picture.)

A couple tips:
  • No need to cut the onion any smaller than in half.  It will cook down and mash up with the beans. 
  • After I mashed my beans, they looked a bit thin so I let them cook for about 30 minutes with the lid off to thicken them up a bit
  • I have read that you should never add salt while beans are cooking because it can make them tough.  I don't know this for a fact, but I waited to add the salt at the end just in case.  I added 1 tbsp. of salt, which ended up being a bit too salty for me, so I backed the recipe off to 2 tsp. 
  • I'll probably add more cumin and will definitely use fresh chiles next time
This makes a ton of refried beans.  They freeze wonderfully.  I separated them into 1 1/2 c. portions, which is about what we use for one meal.

Tuesday, March 1, 2011

Pasta with Brussels Sprouts and Mushrooms

I discovered my love for brussels sprouts last winter.  I was watching Good Eats (really miss that since we ditched cable) and the episode was all about them.  They looked so good, but I think John thought I'd lost my mind when I said I wanted to try them.  I ignored that, bought a pound at Whole Foods, and roasted them with olive oil, salt, and pepper.  Oh, my.  I think I ate 3/4 of a pound myself.  From that point on, I became obsessed.  Don't laugh, they're that good!  Every time I make them I have to apologize to John for eating more than my fair share.

This weekend, I was going through all my cooking magazines and tearing out recipes so I could get more organized and I found this pasta recipe. 

Ingredients (adapted from Everyday Food magazine):
  • 1 box whole wheat penne
  • Olive oil
  • 10 oz cremini mushrooms, sliced
  • 1 lb brussels sprouts, trimmed and shredded (I wish I had a mandoline for this, but I don't.  I just split them in half and thinly sliced them)
  • 2 shallots, sliced
  • 5 cloves of garlic, minced
  • 1 tsp. finely grated lemon zest
  • 1 tbsp. lemon juice
  • Salt and pepper
To make:
  • Cook pasta according to package directions, drain, reserving about 1 c. cooking liquid
  • Meanwhile, heat olive oil in a large skillet (I am terrible about measuring oil, it was maybe 1-2 tbsp.)
  • Add mushrooms and cook until browned, remove from skillet
  • Add a bit more oil and saute garlic and shallots until fragrant
  • Add shredded brussels sprouts, salt, and pepper, and saute until sprouts are tender and bright green (maybe 5 minutes)
  • Stir mushrooms and lemon zest in with brussels sprouts
  • Add mix to pasta, stirring in enough reserved pasta liquid to make a sauce coating the pasta
  • Add lemon juice and season with salt and pepper to taste


It's quick, easy, flavorful, and filling.  I'll probably add more garlic next time but we eat enough garlic to kill 100 vampires here.  A pinch of red pepper flakes might be nice to spice it up.  Maybe a bit of grated parmesan cheese, if you want. If you want to up the protein (although the whole wheat pasta has a good amount), cannelini beans, pancetta, or ham would be good.  You could really do a lot with this!

Monday, February 28, 2011

Veggie Quesadillas with Homemade Tortillas

I've been craving Mexican food lately, but I'll admit that the prospect of eating out makes me more than a little nervous, given all the foods I need to avoid right now.  Sadly, my absolute favorite store-bought tortillas (found at none other than Trader Joe's) are also off-limits for the time being.  Luckily, I have a tortilla recipe in my arsenal because for a time last year, TJ's briefly stopped carrying the aforementioned tortillas.  Whew!

Flour Tortillas (ever so slightly adapted from Homesick Texan):
  • 2 c. flour
  • 1 1/2 tsp. baking powder
  • 1 tsp. salt
  • 2 tsp. canola oil
  • 3/4 c. So Delicious Unsweetened Coconut Milk, warmed)
To make:
  • Mix flour, baking powder, salt, and oil
  • Slowly stir in the warm milk until a loose, sticky ball is formed
  • Knead for two minutes on a floured surface
  • Place dough in a bowl and cover with a damp cloth for 20 minutes
  • After the dough has rested, split into eight balls, place on a plate (make sure they aren’t touching), and cover with damp cloth for 10 minutes
  • On a floured surface, roll each ball into an 8" circle (roll from the center out and use as few rolls as possible so the dough doesn't get overworked because then the tortillas will be tough)
  • Keep rolled-out tortillas covered until ready to cook
  • Heat a dry cast iron skillet and cook each tortilla about thirty seconds on each side (puffy air pockets will form - don't worry, they'll deflate)
  • Keep cooked tortillas covered
Veggie Quesadilla:
  • Olive oil
  • 1 onion, thinly sliced
  • 1/2 red bell pepper, thinly sliced
  • 2 small zucchini, thinly sliced
  • 5oz mushrooms, sliced
  • 1/2 tsp. cumin
  • 1/2 tsp. garlic powder
  • 1/2 tsp. chili powder
  • Salt & pepper
  • Shredded cheese (I used Daiya shredded "cheddar")
  • Tortillas
To make:
  • Heat olive oil in skillet
  • Add onions and peppers, let cook for a couple minutes
  • Add mushrooms and zucchini
  • Stir in spices and cook until veggies are at desired tenderness
  • Place tortilla in a heated lightly oiled skillet, add desired amount of shredded cheese and veggies, top with second tortilla
  • When bottom tortilla is lightly browned and cheese is melted, flip and brown top tortilla
  • Cut in quarters; serve with salsa, guacamole, etc.

See those lovely refried beans?  I made them in my crockpot!  Stay tuned for that recipe.

I made three quesadillas and had enough veggies leftover to have 2 soft tacos for lunch the next day.  So good and I'm craving more.  I think this will be something I make often - if you use store-bought tortillas, this is a super quick and healthy lunch/dinner.  However, making the tortillas from scratch really didn't add much time at all, since I could prep the veggies while the dough was resting and I was cooking the tortillas at the same time I was cooking the veggies. 

Sunday, February 27, 2011

Blueberries = good. Oatmeal = good. Pancakes = good. Blueberry oatmeal pancakes = great!

As I was making dinner Friday night, Samantha asked me to make pancakes.  Too bad I was already in the process of making chicken marsala (in hindsight, pancakes would have been better, probably due to the fact that I failed to realize before starting that I had only about 1/3 the amount of marsala wine called for in the recipe.  Whoops.).

Knowing my child, I made sure to ask if she still wanted pancakes Saturday morning.  If I didn't ask before making them, she'd have a meltdown because she wanted eggs or something.  Much to my surprise, she still wanted them, although she didn't want blueberries (well, she didn't want any in her pancakes.  She did proceed to steal my measuring cup full of frozen blueberries and devour them.).

Ingredients:
  • 1 c. whole wheat flour
  • 4 tbsp. brown sugar
  • 2 tbsp. baking powder
  • 3/4 tsp. salt
  • 1 1/2 c. rolled oats
  • 2 c. So Delicious Vanilla Coconut Milk
  • 3 eggs, beaten
  • 1/4 c. canola oil
  • 1/2 c. frozen organic wild blueberries
To make:
  • Combine oats and milk, set aside
  • Mix flour, brown sugar, baking powder, and salt
  • Whisk eggs and oil into oats
  • Stir oat mixture into dry ingredients
  • Preheat cast iron skillet or griddle
  • Pour batter into pan (I used a 1/2 c. measuring cup) and sprinkle some blueberries on top
  • Flip when edges are set and center is bubbly
  • Cook until lightly browned


Blueberry-less pancakes


Not blueberry-less pancakes
These were seriously the best looking pancakes I have ever made.  I am in love with my cast iron cooking vessels.  They may also be the best tasting pancakes I've ever had.  I will never buy premade pancake mix again. 

Fruit and Oatmeal Muffins

I've been on a big oatmeal kick lately, so these muffins were right up my alley.  They're very versatile, too.  So far I've made them with wild blueberries and raspberries.  The raspberry were good, but I loved the wild blueberry muffins.  Wild blueberries are so much better than regular blueberries - if you've never tried them, they're worth the extra money (psst . . . TJ's has dried and frozen ones right now.  Both are yummy).   Next time, I'll make strawberry.

Ingredients (adapted from Better Homes and Gardens):
  • 3 c. whole wheat flour
  • 1 1/2 c. rolled oats
  • 4 tsp. baking powder
  • 1 tsp. baking soda
  • 1/2 tsp. salt
  • 2 eggs, beaten
  • 1 1/4 So Delicious Coconut Milk (vanilla or unsweetened, I've used both)
  • 1c. packed brown sugar
  • 1/2  c. oil (I've used canola and coconut oils.  I really prefer the coconut oil; I think the muffins came out more moist)
  • 2 tsp. vanilla
  • 12oz package frozen berries (or fresh when they're in season)
To make:
  • Preheat oven to 350
  • In one bowl, stir together flour, oats, baking powder, baking soda, and salt
  • In a second bowl, mix eggs, milk, brown sugar, vanilla, and oil (if using coconut, melt first)
  • Stir wet mix into dry ingredients being careful not to overmix
  • Fold berries into batter
  • Spoon into greased muffin tins
  • Bake for 25-30 minutes for regular sized muffins, 15-20 minutes for mini muffins, or until toothpick comes out clean
  • Cool in tins on wire rack for 5 minutes, then carefully remove from tins
The above measurements yielded 24 mini muffins and 12 regular sized muffins for me. 

The raspberry oatmeal muffins
 These muffins also freeze really well.  Just wrap in foil and put in a ziplock bag.  You can thaw them in the microwave or just let them hang out on the counter for an hour or so.  Once thawed, just warm them up to serve.

Thursday, February 24, 2011

Mushroom Quinoa

In my neverending quest to pack lots of nutrition into the small amount/variety of food Samantha eats, I came across quinoa (pronounced "keenwah").  Perfect!  It's extremely nutritious and looks like couscous, which she loves.  The first time I made it, I just prepped it in my rice cooker and added about 1/2 c. of TJ's bruschetta, some sweet bell peppers sauteed in olive oil and minced garlic, salt, and pepper (a recipe adaped from my "I Love Trader Joe's" cookbook).  It was good and Samantha ate it (although she picked out the veggies).

I then came across a quinoa recipe with mushrooms while browsing the Food Network site.  I love mushrooms, so I decided to make it last night. 

Mushroom Quinoa (adapted from here):
  • 1 tbsp. olive oil
  • 1 onion, diced
  • 8 oz. cremini mushrooms, cleaned and sliced
  • 1 1/2 c. quinoa, rinsed and drained
  • 1/2 tsp. dried thyme
  • 1 bay leaf
  • 1 1./2 tsp. sea salt
  • Freshly ground black pepper
  • 3 c. low sodium chicken broth
To make:
  • Heat olive oil in a large saucepan (I used my 10" cast iron skillet)
  • Saute onion until translucent
  • Add mushrooms and cook until brown
  • Stir in quinoa, thyme, bay leaf, salt, and pepper and let cook for a couple of minutes
  • Add chicken broth and bring to a boil
  • Reduce heat, cover, and simmer for 15 minutes
  • Turn off heat, remove lid to stir, replace lid and let sit for about 10 minutes
  • Adjust seasoning if necessary


I thought this was very tasty.  I think Samantha even ate a bit of it, though I'm sure she picked out any stray mushrooms or onions that made it on her plate.

Pizza Night!

One food I really missed when I was dairy-free while nursing Samantha was pizza.  I had heard most soy chesee was terrible and found that most rice cheese contained casein.  At some point, probably about a year or so ago, I decided to try some soy cheese at Whole Foods.  It wasn't too bad, and after almost two years of no cheese, I found it to be acceptable. 

Now, with Patrick, I can't eat dairy OR soy, so no more pizza for me . . . or so I thought.  A few weeks ago, while grabbing some soy cheese to make Samantha a pizza, I found Daiya at Whole Foods.  Dairy-free, soy-free "cheese" in cheddar and mozzarella.  Might as well give it a shot; I figured it couldn't be any worse than the chemical-laden processed dairy cheeses out there. 

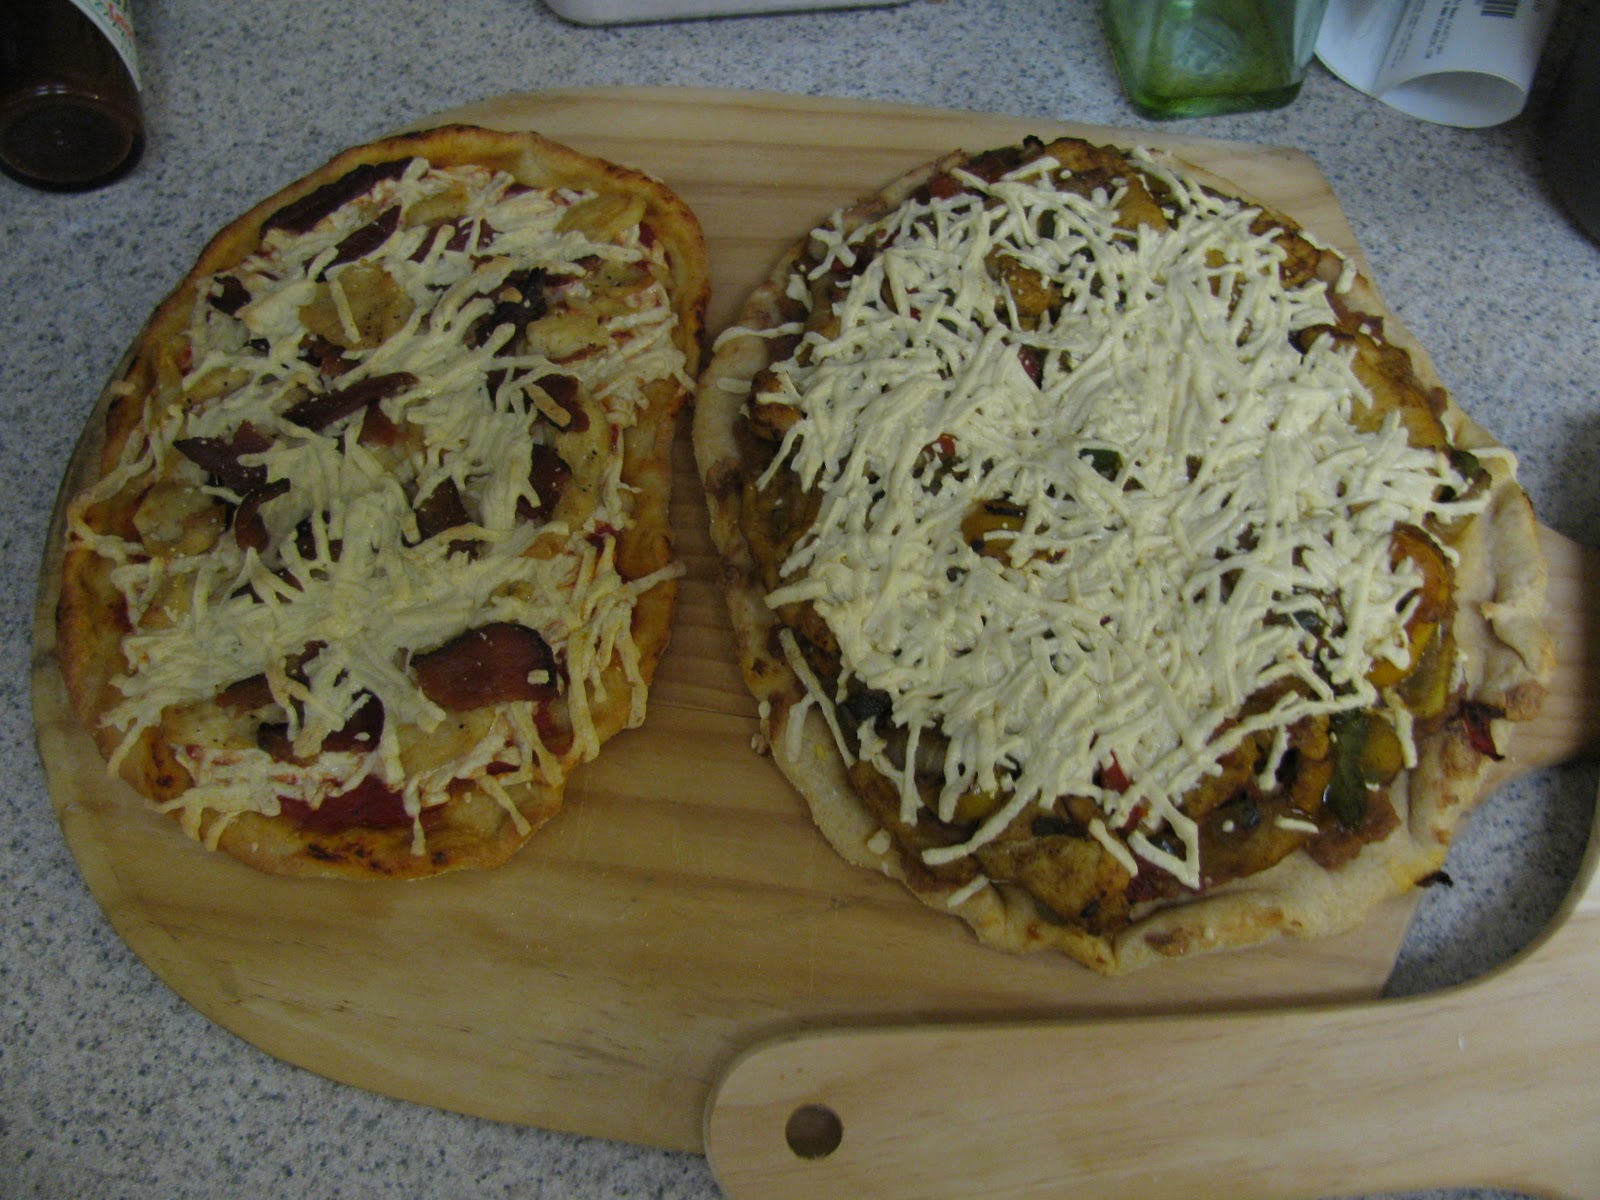
It's not bad.  It melts well and is kinda stringy like melted mozzzrella.  It doesn't really taste like cheese, but it has a similar mouth feel.  I declare it a winner.

And so I decided we should do a weekly pizza night.  It was supposed to be Saturdays, but forces conspired against us last weekend and pizza night was on Monday.  I made pizza dough from scratch and baked up three different pizzas.

Pizza Dough (courtesy of Tyler Florence):
  • 2 1/4 tsp. instant dry yeast*
  • 1 tsp. sugar
  • 1 c. warm water (not too hot or the yeast will start to die)
  • 1 tbsp. salt
  • 2 tbsp. olive oil
  • 3 c. flour (I use half whole wheat, half white)
* The original recipe calls for 1 packet of active dry yeast.  I buy instant dry yeast in bulk, so I use that.  Usually, one packet of active dry yeast contains 2 1/4 tsp. of yeast.  Most things I've read say to decrease the amount of yeast by 25% when using instant in place of active, as instant is more potent.  I don't because 2 1/4 tsp. is stuck in my head when I read a recipe.  I don't think it causes a problem. 

To make:
  • Dissolve yeast and sugar in warm water and let sit for 5-10 minutes, until the yeast starts to foam.  This is called proofing - making sure the yeast is still live.  If it doesn't foam, the yeast is dead and the dough won't rise. Some people skip proofing with instant dry yeast but I don't like to take any chances.
  • Attach dough hook to stand mixer (if using; otherwise you can mix and knead by hand, which is what I used to do)
  • With mixer on low, add olive oil and salt
  • Slowly add flour (depending on the humidity of your kitchen, you may need a bit more or less than 3 c. - I usually add in 1/2 c. increments and start assessing the stickiness of the dough after 2 1/2 c.  I stop adding flour when the dough is no longer sticky.)
  • Turn mixer to 2 and mix until dough starts to form a ball
  • Turn dough onto lightly floured surface and knead until smooth and elastic
  • Place ball into lightly oiled bowl, cover with a towel, and allow to rise until doubled in bulk (about 1 hour, depending on the warmth of your kitchen)
  • Place pizza stone in oven and preheat to 450 (sadly, my pizza stone cracked and I haven't gotten a  new one yet, so I place upside down cookie sheets in the oven
  • When doubled, divide dough into three equal balls and let them rest covered for 10 minutes
  • Roll a ball out to desired thickness (I can't for the life of me roll it out to a 12" circle like Tyler suggests)
  • Place dough on pizza peel sprinkled with cornmeal (helps the pizza slide off the peel into the oven)
  • Top pizza, slide into oven, and bake for 12-15 minutes, until crust is golden brown
Now for the toppings!  I haven't yet tried to make my own pizza sauce - Whole Foods' sauce is yummy and I haven't had the chance to replicate it. So on this, the second weekly Winter Pizza Night (two days later than planned), I made three pizzas:

1.  Just sauce and "cheese" (for Samantha)


2. Sauce, fresh minced garlic, cooked diced pancetta, cremini mushrooms, shallots, and "cheese" (mainly for John)


3. Olive oil, fresh minced garlic, chopped spinach (thawed and all water squeezed out), cremini mushrooms, shallots, and "cheese" (mainly for me)

Yum!  Look for more combinations in the coming weeks!

Sunday, February 20, 2011

Coconut Brownies

We're big on coconut here.  Really big (seriously, you should see our refrigerator, freezer, and pantry.  It's like a So Delicious factory exploded).  Recently I've been reading about the benefits of coconut oil and have decided to start using it more often in my baked goods.  So far, I've used it in granola bars, blueberry muffins, and these brownies.  The other recipes will be coming soon but need tweaking.  The brownies are perfect as is, no tweaking needed (though that likely won't stop me from tinkering with it later - caramel swirl anyone?).


Ingredients:
  • 1/2 c. coconut oil
  • 1 tsp. vanilla
  • 1 c. sugar
  • 2 large eggs
  • 1/2 c. whole wheat flour
  • 1/3 c. cocoa powder
  • 1/4 tsp. baking powder
  • 1/4 tsp. salt
  • 1/2 c. flaked or shredded unsweetened coconut
To make:
  • Preheat oven to 350
  • Melt coconut oil (I put it in the microwave for less than 30 seconds)
  • Whisk oil, sugar, and vanilla
  • Whisk in eggs
  • Mix dry ingredients in a separate bowl
  • Fold dry ingredients into wet mixture
  • Pour into greased 9x9 baking dish
  • Bake for 20-25 minutes, until edges start to come away from the dish (the center may look a bit underdone)
  • Cut into squares when cool (or mostly cool - we couldn't wait any longer)
These brownies are amazing.  They are rich, moist, slightly gooey, and very coconut-y.  I barely got my pictures taken before John was trying to swipe one.


Friday, February 18, 2011

Pasta with Langostinos

This week has been a rather uninspired week, food-wise.  It happens to the best of us.  But I wanted to make something a little nicer for Valentine's Day and I had a bag of frozen cooked langostinos from TJ's that I've wanted to make for a couple of weeks.  Perfect!


Ingredients:
  • 2 tbsp. soy-free Earth Balance (or real butter)
  • 2 tbsp olive oil
  • 1 onion, sliced
  • 2-3 cloves of garlic, minced
  • 6-8 oz cremini mushrooms, sliced
  • 12 oz frozen langostinos, thawed
  • Salt & pepper
  • Any long pasta (I used whole wheat spaghetti), prepared according to package directions
To make:
  • Melt butter and olive oil in a large skillet
  • Saute onion until soft
  • Add minced garlic and saute until fragrant
  • Add mushrooms and saute
  • Add langostinos - since they're pre-cooked, take care not to do any more than simply heat them through, otherwise they'll end up rubbery
  • Salt & pepper to taste
  • Serve over pasta
I'm sure it would be fabulous with a bit of freshly shaved parmesan cheese on top.  You could also replace the langostinos with shrimp.

Too bad for me the baby wanted to nurse as I finished making dinner and John had a rough time getting Samantha to sleep (falling asleep himself in the process), so I didn't get to eat this right away.  I ended up heating up the leftovers for lunch on Wednesday and I have to say, it was still pretty good.  John will have to weigh in on the fresh dish.

Friday, February 11, 2011

Loaded Potato Soup

When I came across this recipe for loaded potato soup last week, I couldn't resist adapting it to our dairy/soy free diet.  I decided to go ahead and make it tonight and I was not disappointed.

Ingredients:
  • 12oz bacon, chopped
  • 1 onion, diced
  • 8 medium russet potatoes, peeled and cubed
  • 3 c. chicken stock
  • 3 tbsp. Earth Balance dairy/soy free butter
  • 3 tbsp. flour
  • 1 1/2 c. So Delicious Unsweetened Coconut Milk Beverage
  • 6 green onions, sliced
  • 3/4 c. steamed broccoli, chopped (optional)
  • Freshly ground black pepper
To make:
  • Fry bacon in dutch oven or other large pot (but really, everyone needs a cast iron dutch oven - mine is awesome!)
  • When crisp, remove from pot and drain, leaving bacon grease in the pot
  • Saute diced onion in bacon grease until translucent
  • Add potatoes and chicken stock; simmer until potatoes are tender (about 10-12 minutes for the medium size pieces I cut)
  • Remove about 1 c. of potatoes from pot and mash, set aside
  • While the potatoes are simmering, melt butter in a small sauce pan
  • Whisk flour into melted butter and cook for two minutes
  • Whisk in milk, bring to a boil, then simmer until thickened
  • Slowly stir milk mixture into the pot, bring to a boil and reduce to a simmer
  • Add mashed potatoes, broccoli, most of the bacon, and most of the green onions to the pot, reserving some bacon and green onions for garnish
  • Salt & pepper to taste
  • Let simmer for about five minutes


Serve garnished with bacon and green onions.  Add some nice, freshly baked crusty bread for a hearty meal.

Being unable to eat dairy is difficult, because I love cheese (as if you couldn't tell from my previous post).  But honestly, I didn't miss the cheese in this at all.  And there was no coconut flavor from the coconut milk.  It was just a delicious, creamy potato soup.

Easy (and versatile) Balsamic Vinaigrette

In the past few years (pretty much ever since munchkin #1 was born), we've really tried hard to eat healthier.  We didn't eat terribly before, but there's always room for improvement.  And we want to set a good example for the kiddos. 

One of the things we've done is start frequenting farmers' markets, which is fun.  Last summer, we went to one organized by someone at John's company and I bought some arugula.  If you've never had it, it is a nutty and slightly spicy green.  Very yummy.  I needed a dressing to go along with it ~ something that would complement, and not overpower, the delicate arugula.  A balsamic vinaigrette!  But I have had a hard time finding one I love ~ most are just ok and don't do a tomato/basil salad justice (oh, how I miss the mozzarella part of that salad).  So I knew I had to make it myself.

Balsamic Vinaigrette (adapted from Emeril Lagasse)
  • 1/4 c. good balsamic vinegar (I'm partial to TJ's Balsamic Vinegar Modesto)
  • 1 large garlic clove, minced
  • 2-3 tsp. spicy brown or dijon mustard (I like 3)
  • 1 tsp. sugar
  • 1/2 c. olive oil
  • Salt & pepper
Whisk the first four ingredients together.  Slowly whisk in olive oil.  Salt and pepper to taste.  That's it!

I used this on a salad of arugula, mixed greens, tomatoes, and goat cheese (oh, how I miss goat cheese).  I also used it on tomato/basil salad ~ perfect (well, except for the lack of mozzarella)!  And a little goes a long way because of its big flavor.

I made this dressing again the other day, since we lacked a dressing in the fridge that was dairy/soy free.  The next day at lunch, I was looking for a way to jazz up my rice pilaf with grilled chicken.  That balsamic vinaigrette called to me.  I poured a bit on and it was delicious!  See, easy and versatile!

Wednesday, February 9, 2011

Fried Zucchini

I thought I'd start out with something easy . . .

I made fried zucchini for the first time last night.  I bought a pound of zucchini at Trader Joe's (I'll just call it TJ"s from now on - we're close like that) and just didn't want to make my usual sauteed or grilled zucchini.  And I'm always looking for excuses to use my new cast iron skillet.

Ingredients:
  • 1lb zucchini, sliced into thick rounds
  • 2 eggs, beaten
  • 1 c. bread crumbs (I used panko)
  • 1/2 c. whole wheat flour
  • 1 1/2 tsp. garlic powder
  • Salt
  • Black pepper
  • Olive oil (for frying)
To make:
  • Mix dry ingredients
  • Dip zucchini in egg wash
  • Coat zucchini in dry mix
  • Fry until golden brown on both sides


  • Drain on paper towels
  • Season with salt while still hot


Are they pretty?  No.


 Were they delicious?  Yes!  I definitely OD'd on them, but they were salty, garlicky goodness.

Introduction

I love to cook and just a few days ago had the brilliant idea to start a cooking blog.  So here I am. 

First, a bit about me.  I'm married to an amazing guy and we have two adorable kiddos, one of whom just entered the world in December 2010.  I'm also an attorney.  But not one of those attorneys everyone hates.  Really.  Well, some people probably hate me, but they don't even know I exist (lucky for me).

I've been cooking since I was a kid, maybe 10 or so, and did the majority of the cooking for my mom and I until I left for college.  It's actually kind of amazing that I like to cook, considering my parents, who are . . . uh . . . slightly cooking challenged (example - my dad thinks tuna pizza is a good idea).  I have recently gotten into baking, as well. 

At the moment, we are a dairy, soy, and beef-free family (thanks, family history of allergies manifesting in my children), so I'm learning how to make lots of things from scratch to avoid dairy and soy ingredients.  While it's more work, it has steered us away from most processed foods and is helping us be healthier.

So enough about me . . . on to the food!